Problem
Deploy an ASP.NET Core 2.1 web application to an AWS Amazon Linux 2 VM with zero downtime to allow for deployments while traffic is being handled. This post is targeted at .NET developers who have minimal or zero experience with AWS or Linux.
Tech Stack
- Octopus Deploy
- ASP.NET Core 2.1 web app
- AWS Application Load Balancer
- AWS Amazon Linux 2 virtual machine
Solution
This post will start after the build has been completed and packages generated.
Step 1 - Deploy Application
This step was inspired by the following posts.
The equivalent of a Windows Service on Linux is using a supervisor to start and monitor a process and ensure it is running successfully. On Amazon Linux 2 the installed supervisor is systemd https://en.wikipedia.org/wiki/Systemd. systemd manages services using files saved in /lib/systemd/system. These files describes the location of your application and various parameters for running the application. This file has been set up to run as the default user from AWS ec2-user, it will also restart the service if it dies after 10 seconds.
This file is used as a template to be used by Deploy.sh that will set up the service and start the service under systemd.
Deploy.sh does a few items to manage the service.
- Set the name of the service from the package being deployed.
- Enable the application to be executed. Due to the package possibly coming from Windows the permissions on the file may not have it as an executable.
- Stop the service before updating to the new location of the application
- Update
SERVICENAMEin theTemplate.servicefile. - Copy
Template.serviceto/lib/systemd/system/folder named as the service name. - Reload the
systemddaemon and enable and start the application service - Outputs the last 10 logs of the service using
journalctlafter 2 seconds - Ensures the service is running
Step 2 - Set up Load Balancer
Using a load balancer such as Amazon’s ALB will enable requests to complete before you stop the service and deploy the application.
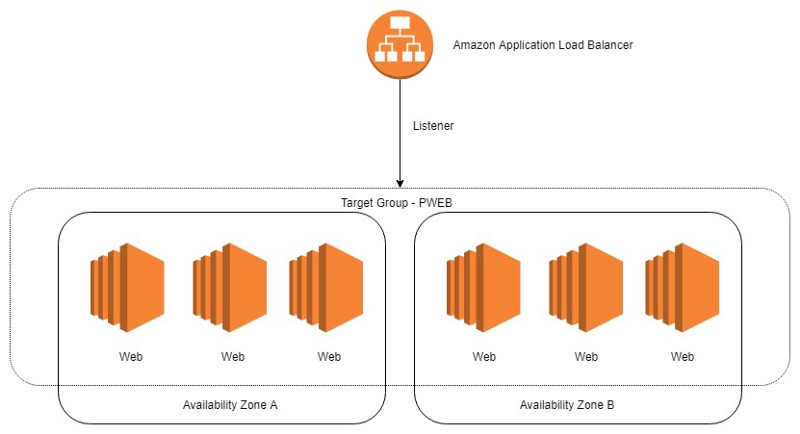
In this method for simplicity each application behind the load balancer on a single set of servers receives a single port designation. This is not a requirement of how the ALB works but it does help make deployment simpler.
AWS has a good guide for setting up an Application Load Balancer.
You can skip the Configure Targets for the Target Group (Step 5 at time of writing this) step as this will be handled by the deployment in Octopus Deploy.
One item that I have missed a few times has been setting the Deregistration delay on the Target Group.
The time to wait for in-flight requests to complete while deregistering a target. During this time, the state of the target is draining.
Personally I recommend 2 times the longest HTTP request you expect your application to serve. This is to allow for any stray requests that could blow out.
An example is if the application will possibly have a 30 second HTTP request then set it to 60 seconds.
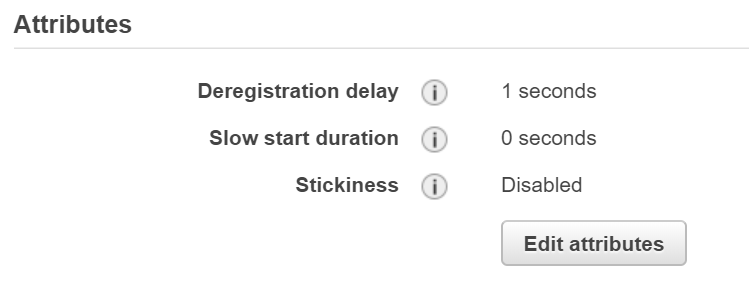 The application in this image has an response time in under 100ms so is using a 1 second deregistration delay since that is the shortest value other than 0.
Step 3 - Adding and removing machines from Target Group
This step is the part that allows for zero downtime deployment. Below is the the deployment process overview.
- Deregister the server from the target group
- Wait for Deregistration delay and all in-flight requests to finish
- Deploy updated service. See Step 1
- Register the server in the target group
- Wait for server to become healthy in the target group
These steps need to be executed in a rolling manner. Depending on the number of servers you have and require to handle traffic will help you set the number of servers that can be out of the load balancer at a time. eg. If you have 2 servers then you will do a rolling deploy of 1 server at a time. For more information check out the Octopus documentation.
Rolling Deployments - Octopus Deploy
_Rolling deployments are a pattern whereby, instead of deploying a package to all servers at once, we slowly roll out…_octopus.com
The deployment pipeline is based around 2 shell scripts. PreDeploy.sh to handle the removing of the server from the target group and PostDeploy.sh to register the server and wait for it to become healthy. Both scripts use Shared.sh to set up the environment and load all the variables that are needed and define the describe-target-health function that is used to output the current health for logging. By using the source keyword it executes the Shared.sh script as part of the current shell session and allows access to anything defined in that file.
Shared.sh
- Define a reusable function
describe-target-healththat will consolidate displaying the current health of the server as the load balancer sees it - Load the target group from octopus and verify it is set
- Get the current instance id from the instance metadata from the AWS instance metadata endpoint https://docs.aws.amazon.com/AWSEC2/latest/UserGuide/ec2-instance-metadata.html
- Set up the AWS credentials
- Check the initial health of the server
PreDeploy.sh
- Execute
Shared.shin current shell - Drain stop the current instance from the target group
- Wait for target to be deregistered
PostDeploy.sh
- Execute
Shared.shin current shell - Register the current instance in the target group
- Wait for target to be registered
Credit
The PreDeploy and PostDeploy scripts were based around http://library.octopus.com/step-templates/2abc4f4f-06f4-4af6-8b10-52651ab4d3d5/actiontemplate-aws-add-or-remove-instance-from-elbv2